

B2B Virtual Store Module
Available at:

This article aims to explain the B2B Virtual Store Module, how to configure and use it.
What is the B2B Virtual Store?
Section titled “What is the B2B Virtual Store?”The B2B Virtual Store, also known as “Virtual Store, B2B Store or Pedido.La”, is an online platform integrated with Demander data, in which the company can allow its customers to self-register or be registered to place their orders autonomously. Orders are sent to Demander and processed together with other orders issued, however, they are duly identified as being made in the Store.
Before activating the B2B Store, it is important to contact our Commercial team, as it is an additional module, subject to an extra cost in the monthly fee. Contact can be made via our email: comercial@demander.com.br
How to activate the Store?
Section titled “How to activate the Store?”To activate the B2B Store, simply access the [B2B Virtual Store Settings] screen (https://sistema.demander.com.br/dinamico/cadastro-lojavirtual). It is necessary, at a minimum, to fill in all mandatory fields (which have a red asterisk) For those of you who are partners, companies will appear on the screen automatically after they are created, just edit the registration.
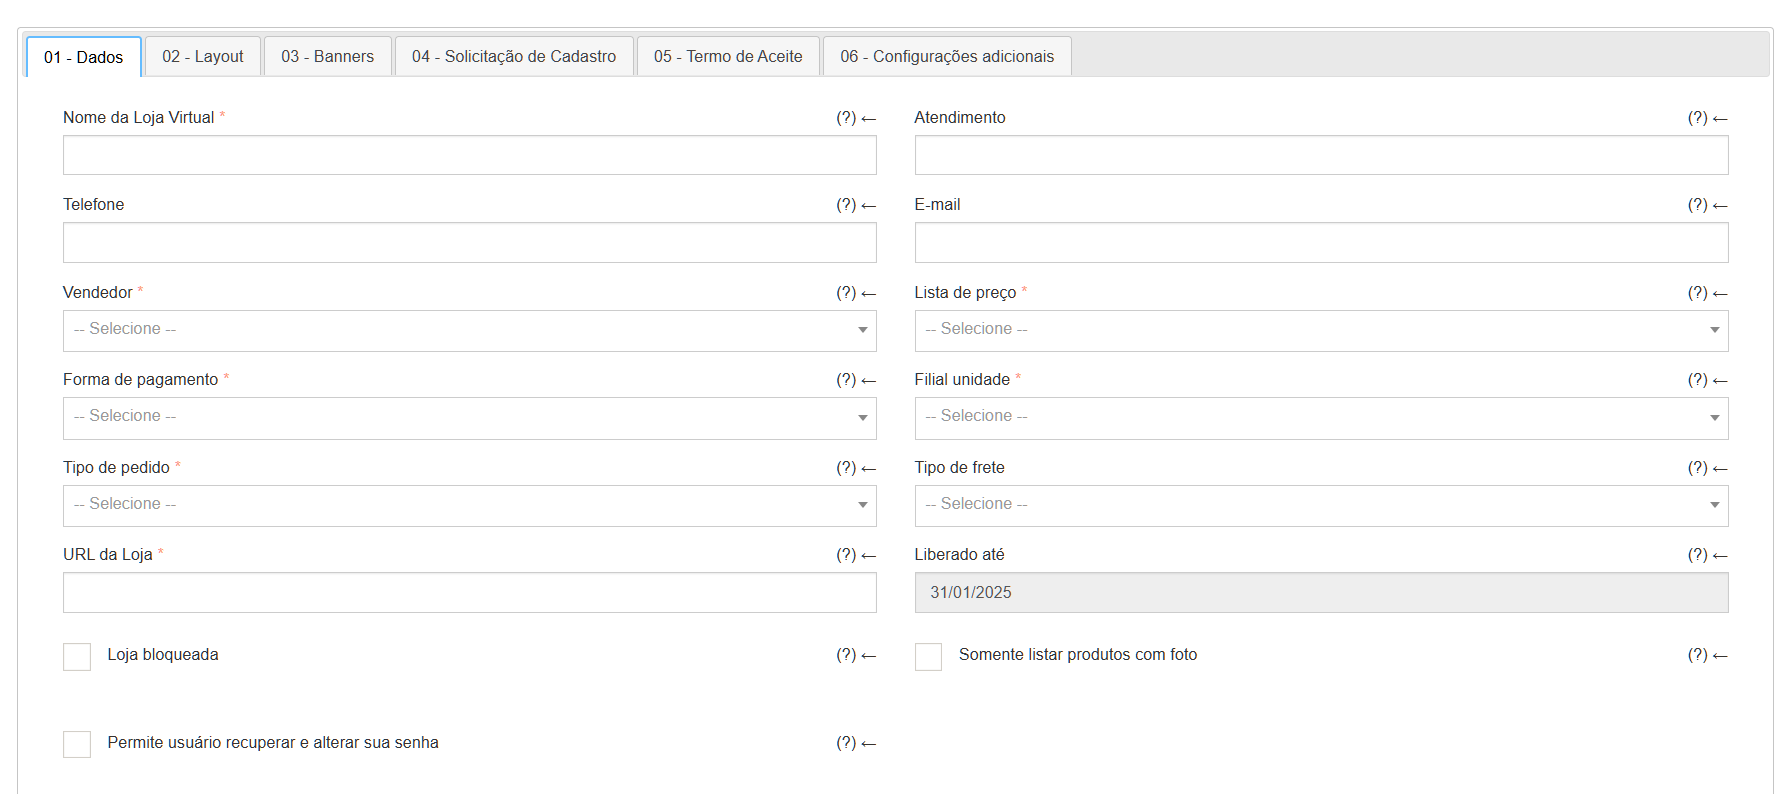
**Company*:**Name of the B2B virtual store that will be displayed in the page titles. Service hours: Text that appears on the second line of the online store header (we suggest using opening hours). **Telephone:**Appears in the online store header. **Email:**Appears in the online store header. **Seller*:**A specific seller must be created for the Online Store due to the Number Range. This seller will be the issuer of the order. The seller configured here cannot be used in Demander Mobile as it will cause number range errors. **Price List:**Products added to this price list are displayed in the B2B Virtual Store when no customer is logged in. After the customer logs in, the store can choose to display products from the linked Price List to the customer. **Payment method:**Store’s default payment method. If the customer has an associated shape, the customer shape will be used. Unit branch*: Orders will be related to the selected branch. Order type*: Defines which order type will be associated with the order. **Store URL:**B2B Virtual Store access URL. Ex.: [subdomain].pedido.la = suaempresa.pedido.la (ending with “.pedido.la” is mandatory). **Released by:**Deadline for testing the Online Store. After this date, the store will only operate if it has the “In Production” status. **Status:**Can be “In testing”, “In deployment”, “In production” or “No longer used”. **Store blocked:**When checked, the store is offline. When accessing the store, a message informs: “This company does not have an enabled online store”. **Only list products with photos:**When checked, the store only lists products with photos; If the product does not have a photo, it will not appear in the store. **Allows the user to recover and change their password:**When checked, the store displays the option to recover the password (on the login screen) and change the password after logging in.
There are several other settings in the “06 - Additional settings” tab, which can be used in the B2B Virtual Store to make it more complete. However, they are not mandatory or necessary for store activation.
Video explaining Store Settings
Section titled “Video explaining Store Settings”-** User**
To place orders on the B2B Virtual Store, you must use a pre-registered user on Demander. It can be registered directly within Demander Web, through the B2B Virtual Store Users screen, or via integration, through table 55 - B2B Virtual Store Users.
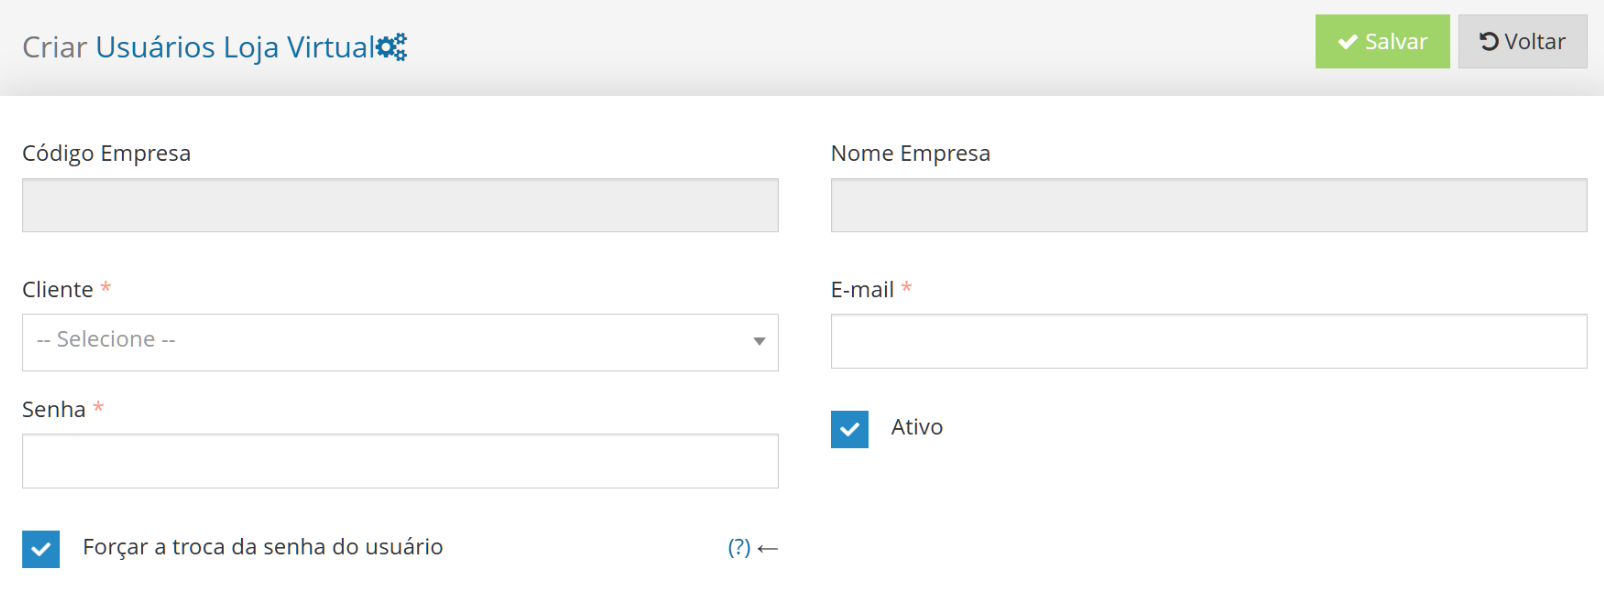
Video Explaining User Registration
Section titled “Video Explaining User Registration”Within Demander, in addition to registration being done manually or via integration, there are the possibilities of Registration Request and Self-Registration.
Registration Request
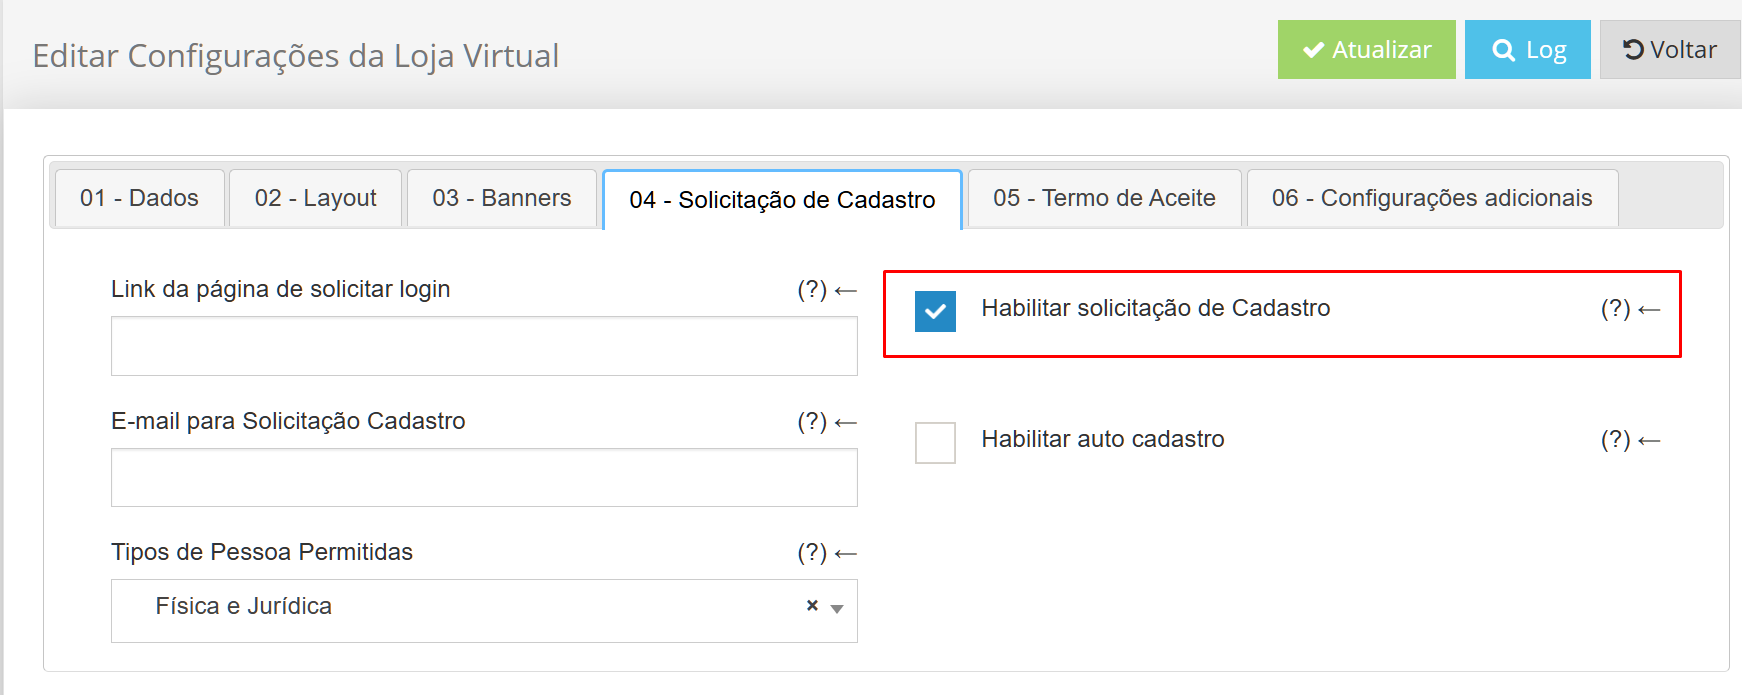
Section titled “Registration Request”If, when accessing the B2B Virtual Store Settings  **“04 - Registration Request” screen, the “Enable Registration Request” option is active, then when the customer accesses the B2B Virtual Store, he or she will be able to request a login to access the Store through a personalized registration form or the standard Demander form.
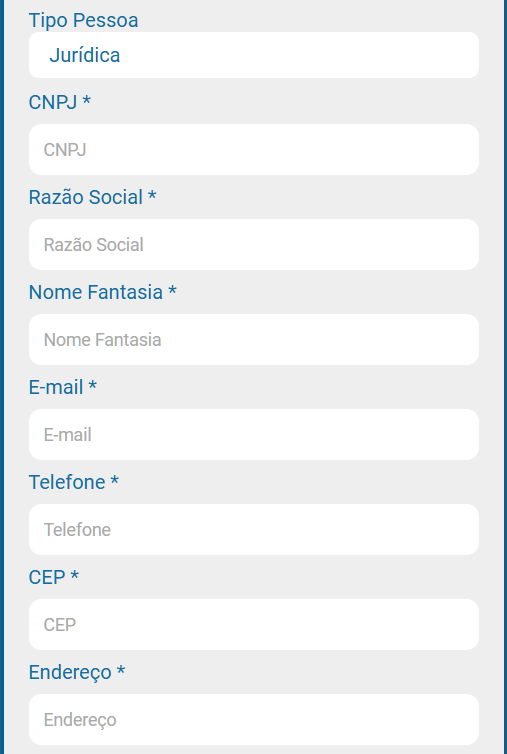
In the B2B Virtual Store, when the visitor selects ** Login ** and goes to “** Request login **”, as shown in the screenshot below:

When you do this, the registration page will open. All fields are mandatory, except the “Message” and “Complement” fields. By clicking the “Request registration” button, the information will be sent to Demander, an email will be sent to the visitor confirming the request, and another email will be sent to the company, alerting them about the new request.
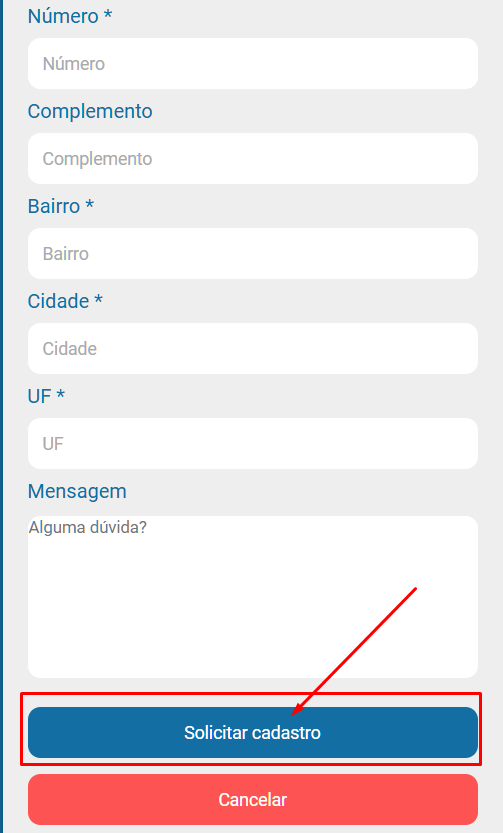
Registration requests can be viewed on Demander Web, on the [B2B Virtual Store Registration Request] screen (https://sistema.demander.com.br/dinamico/solicitacao-cadastro-loja-virtual), where all the information provided by the applicant will be displayed. This screen is only used to control requests; therefore, requests must be evaluated, and the requestor’s registration must be carried out directly in the ERP and sent via integration, or manually registered in Demander.
It is also possible to change the status of the registration request, informing whether it is under analysis, rejected or released, along with the reason for the status, but this information is for information only and does not restrict possible registration. Communication with the requester about the status of the request, as well as providing the access login, must be done via the ERP or manually by the Demander user.
Self Registration
Section titled “Self Registration”To use this functionality, in Demander Web the two options on the B2B Virtual Store Settings  “04 - Registration Request ” screen must be checked, “ Enable Registration Request” and “Enable self-registration”
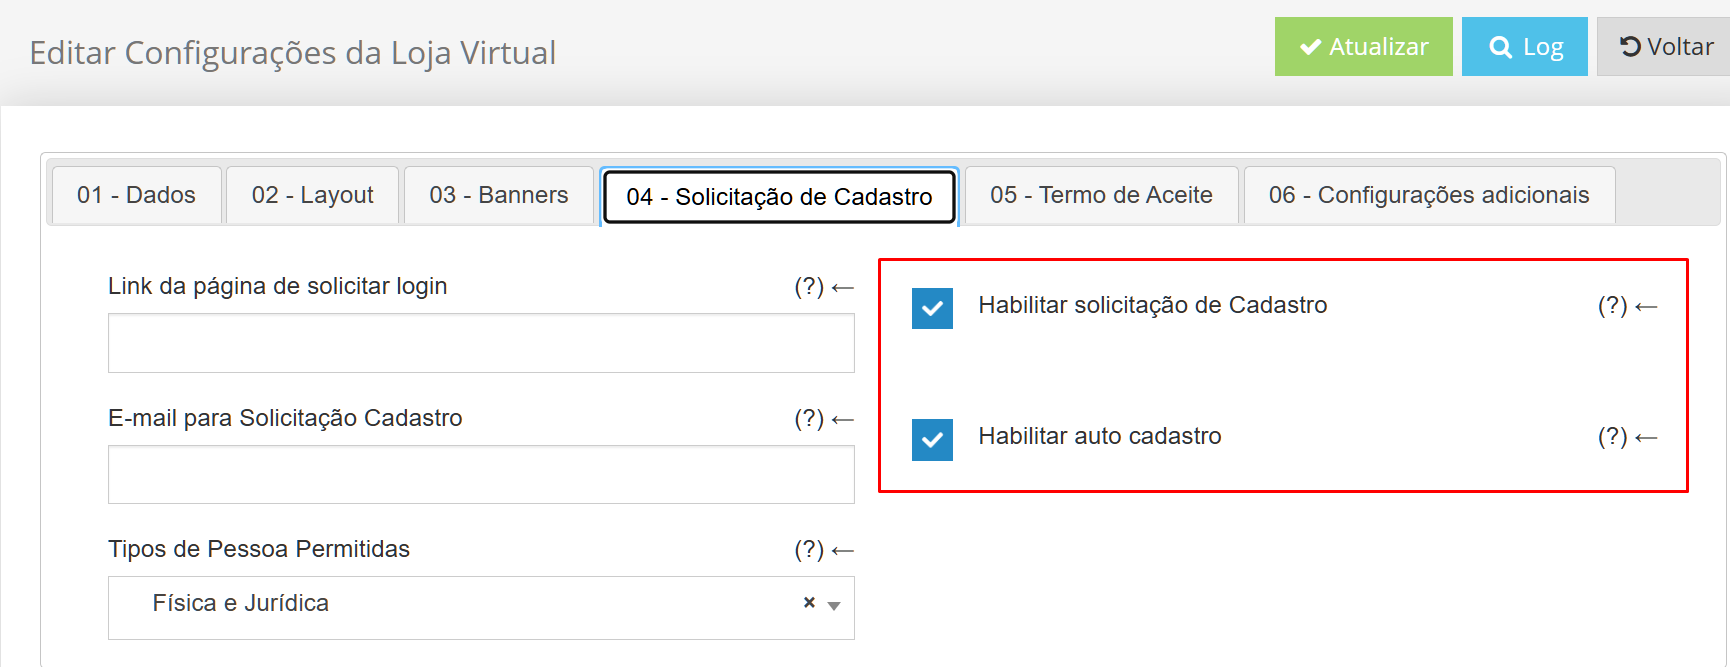
Now, there are some possibilities:** New customer , Customer who already has a user in the Online Store and Customer who does not have access to the Online Store**.
New customer: If the applicant is a new customer, that is, if he is not yet a customer of your company, he will see the same form as the registration request. By filling out this form, they will automatically be registered as a user of the Online Store, becoming a customer of your company. An email will be sent to the applicant with the information necessary for login.
Customer who already has a user in the Online Store: Demander only allows one user per email. Therefore, if the email requesting login is already registered as a user of the Online Store, the customer will be redirected to password recovery. After password recovery, he will be able to access the Online Store.
Customer who does not have a username in the Online Store: If the applicant is already a customer of your company, but does not have a login in the Online Store, then the user needs to be approved and registered, following the same steps as the Registration Request on Demander Web, on the Online Store Registration Request screen, where all the information provided by the user will appear.
*This step is necessary for security reasons. Imagine the following scenario: Customer ABC is already a customer and has already placed several orders, but there is no user in the store. If self-registration were automatic, anyone could register, receive the data and access the store with the ABC Customer’s information. Therefore, customer data must be verified before granting access.
- Video explaining the Self-Registration Request and Registration Request settings
-** Menu Bar The B2B Store menu bar may display different behaviors depending on the Product Groups registered in Demander. Currently, we do not offer a specific setting to choose the menu type. To obtain the desired appearance in the B2B Store, it is necessary to register the Product Groups according to your preference, considering what each type of menu validates.
Structured Menu
Section titled “Structured Menu”For the Structured Menu to appear in the B2B Virtual Store, at least one of the Product Groups must have a “PAI Group”. This allows subgroups to exist in the menu bar, linked to a Main Group. An example would be the PAI Group “Home”, with subgroups such as “Bathroom” and “Kitchen”. When hovering the mouse over the PAI Group, it is possible to view the subgroups (or “children”).

In Demander, the configuration of Product Groups must be done in the same way, on the [Product Group] screen (https://sistema.demander.com.br/dinamico/grupos-de-produto):
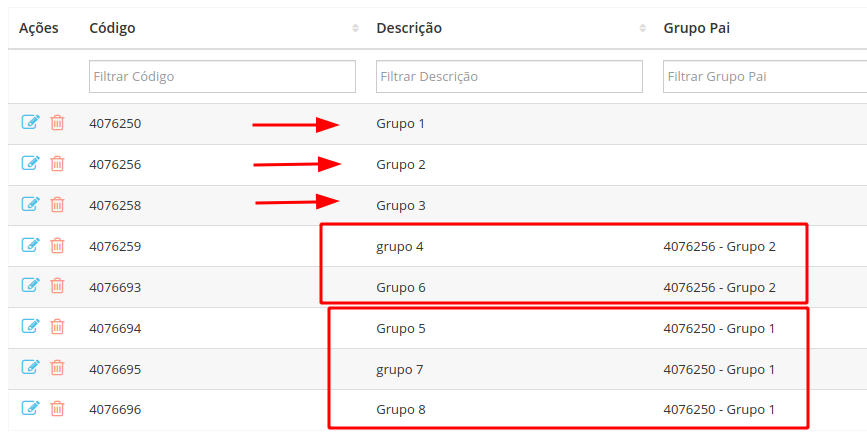
Open Menu
Section titled “Open Menu”For the Open Menu to appear in the B2B Virtual Store, up to 7 Product Groups must be registered in Demander, and none of these Product Groups can have a PAI Group. With this configuration, the menu will look like this:

Below is an example of Product Group configuration. Note that none of the groups have a PAI Group.
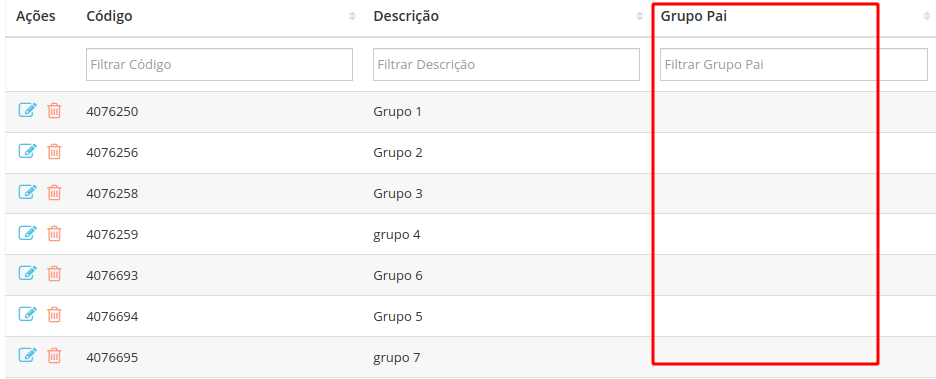
Grouped Menu
Section titled “Grouped Menu”For the Grouped Menu to appear in the B2B Virtual Store, more than 7 Product Groups must be registered and none of these Product Groups must have a PAI Group. With this configuration, the menu will look like this:

Below is an example of Product Group configuration. Note that none of the groups have a PAI Group.
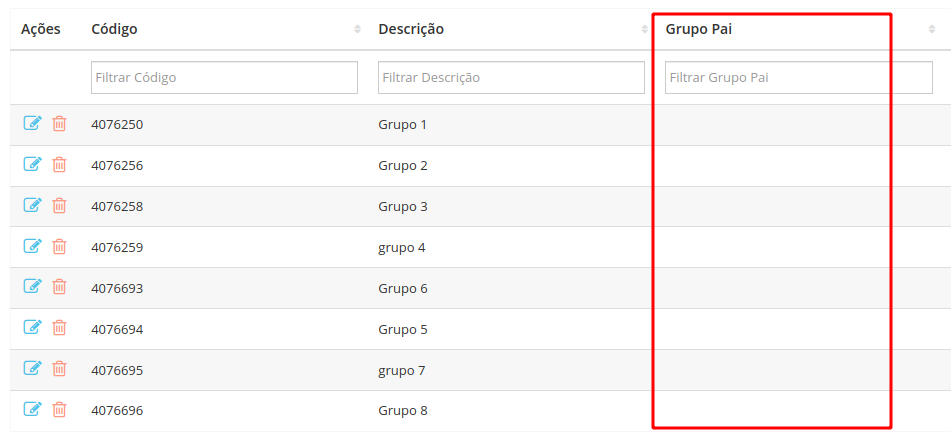
This way, the groups will appear when clicking on “Categories”, showing all Product Groups.

Banner in the B2B Virtual Store
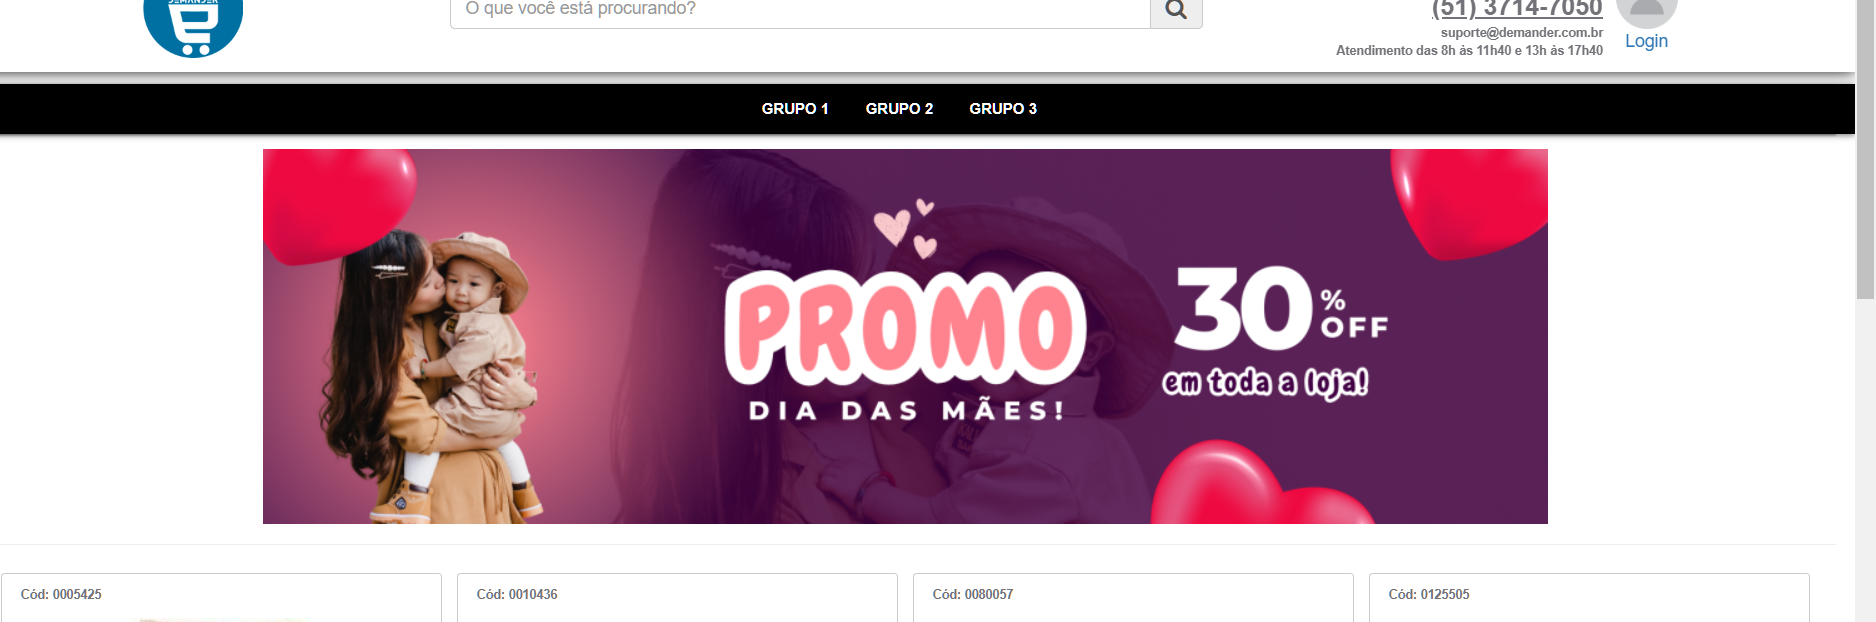
Section titled “Banner in the B2B Virtual Store”In the B2B Virtual Store, it is possible to register banners that will be displayed in rotation on the store’s home screen. The banner will appear right after the menu and before the products. When several banners are registered, they are displayed in a carousel that changes to another banner every 7 seconds. You can also navigate between banners using the arrows < > on each side of the banner. There is no set standard size for banners. To register them, simply access the [B2B Virtual Store Banners] screen (https://sistema.demander.com.br/dinamico/banner).
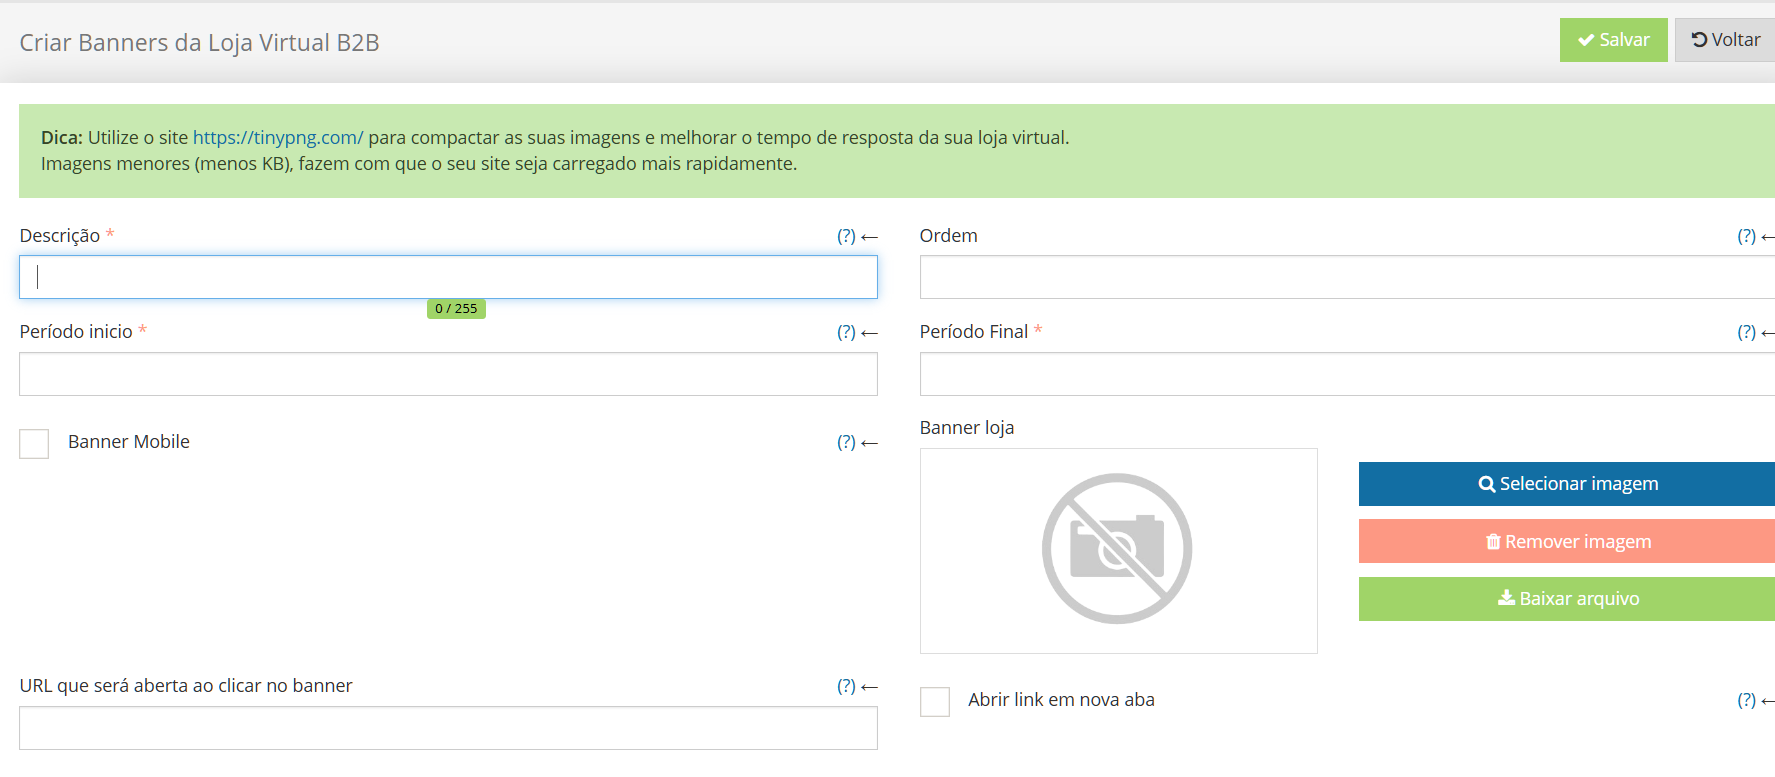
Description: Name to identify the banner, for example: “January promotion banner”, “30% discount promotion banner”.
Order: Order in which the banner will be displayed. When there is more than one banner, this order defines the display sequence. Number 1 displays first, number 2 displays after 7 seconds, and so on.
Start Period*: Date on which the banner should start appearing.
End Period: Date on which the banner must be removed from the store.
Store Banner: Banner image.
URL : Link to the page that will be opened when clicking on the banner image. Example : sualoja.pedido.la/link-do-produtoAbrir link in new tab: If checked, the link will be opened in a new tab; if it is unchecked, the link will open in the same tab.
The banner will be displayed as follows:
Video explaining how to register Banner
Section titled “Video explaining how to register Banner”Featured Products
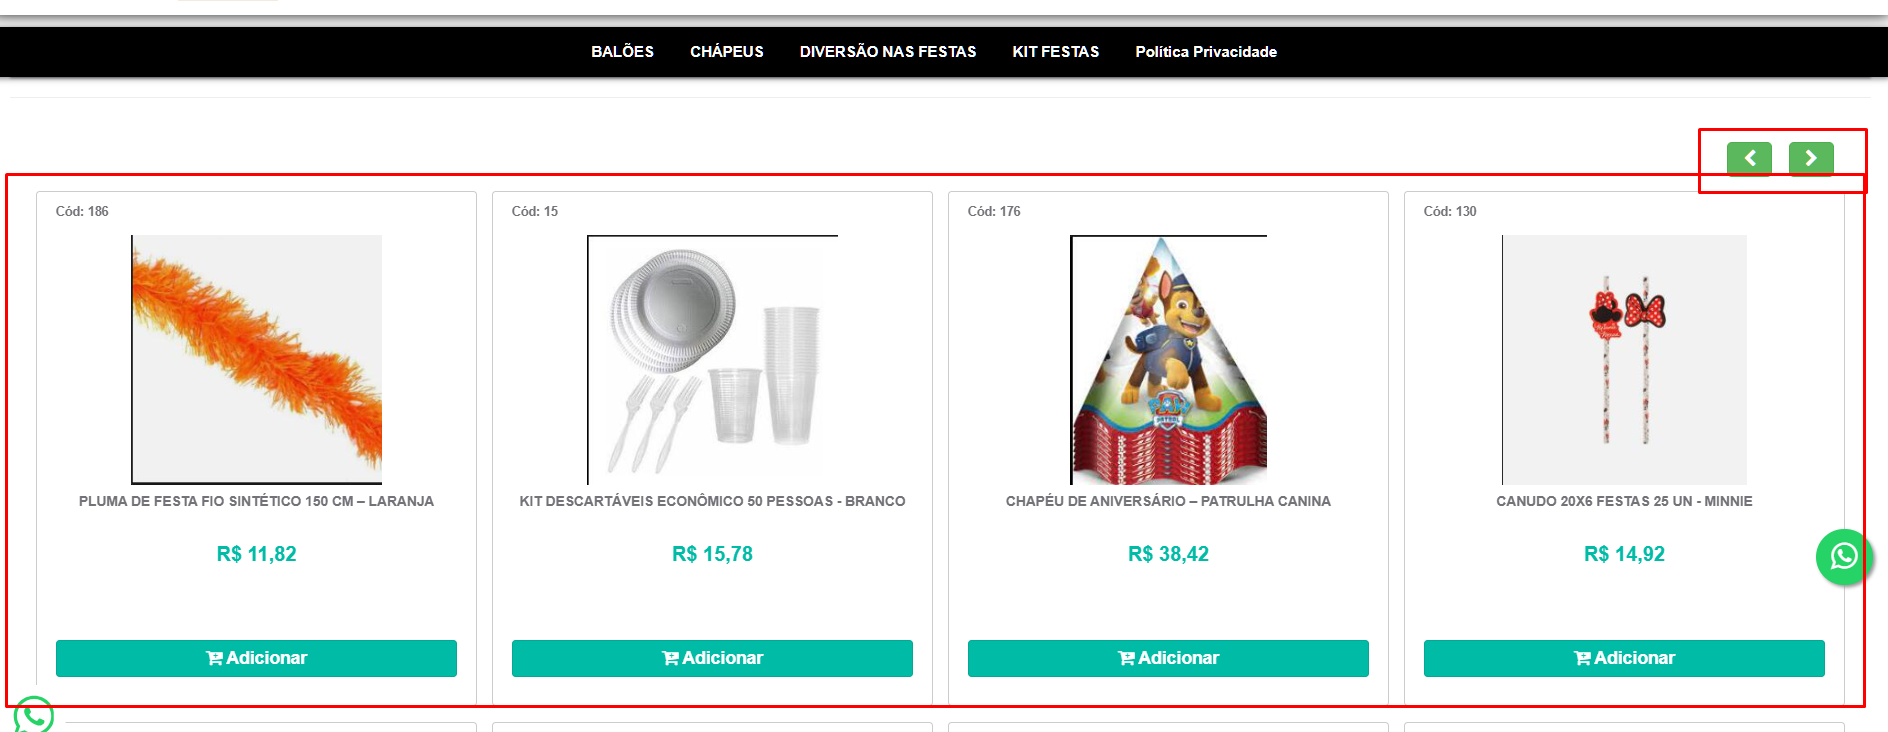
Section titled “Featured Products”The featured products will appear just below the menu, they will be the first products in the store. When several featured products are registered, they are displayed in a carousel that changes the display every 5 seconds. You can also navigate using the arrows. To register them, simply access the [B2B Virtual Store Featured Products] screen (https://sistema.demander.com.br/dinamico/produtos-destaque).
Video explaining how to register a Featured Product
Section titled “Video explaining how to register a Featured Product”Register Page in the B2B Virtual Store
Section titled “Register Page in the B2B Virtual Store”The created pages will be displayed in the menu. Some examples of use for these pages include creating a page with the Refund Policy, Payment Policy, Privacy Policy, more information about the store, among others. To register a new page, simply access the [B2B Virtual Store Page] screen (https://sistema.demander.com.br/dinamico/paginas-loja-virtual).
How to register an order in the B2B Virtual Store?
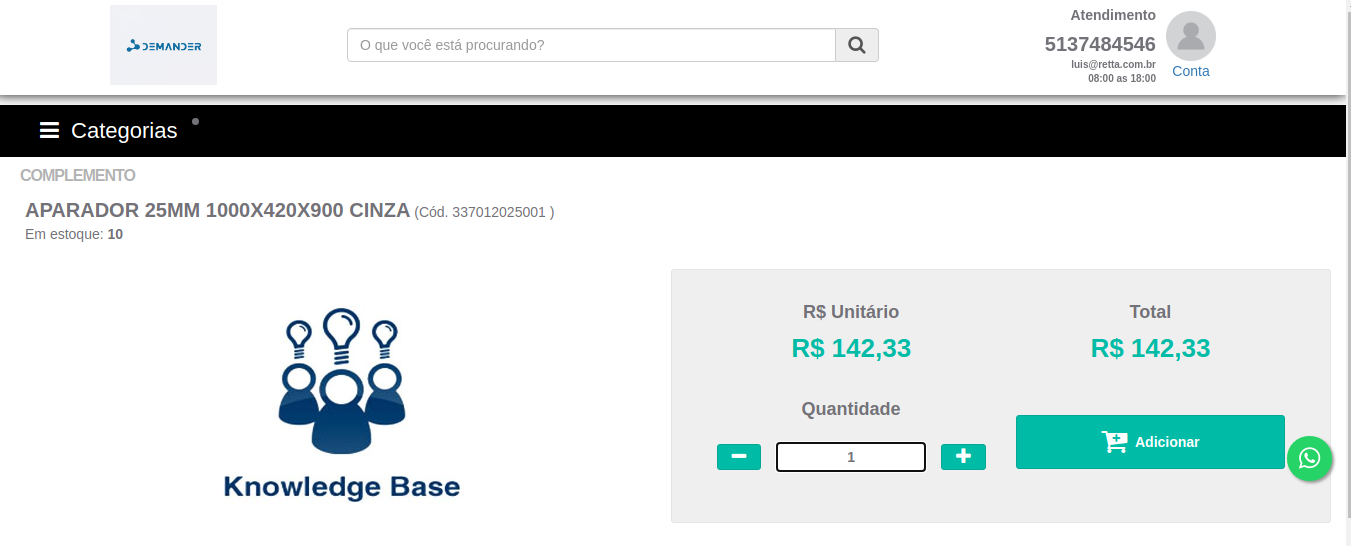
Section titled “How to register an order in the B2B Virtual Store?”After logging into the store, select the product, enter the desired quantity and click “Add”
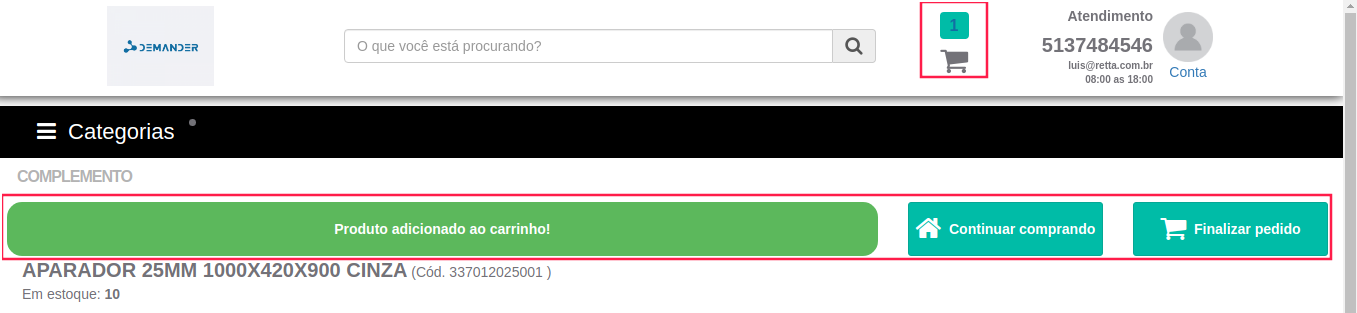
Just above the product name, a message will appear stating “Product added to cart!” and two options: “Continue shopping” and “Complete order”. In the page header, the cart will display the added item.
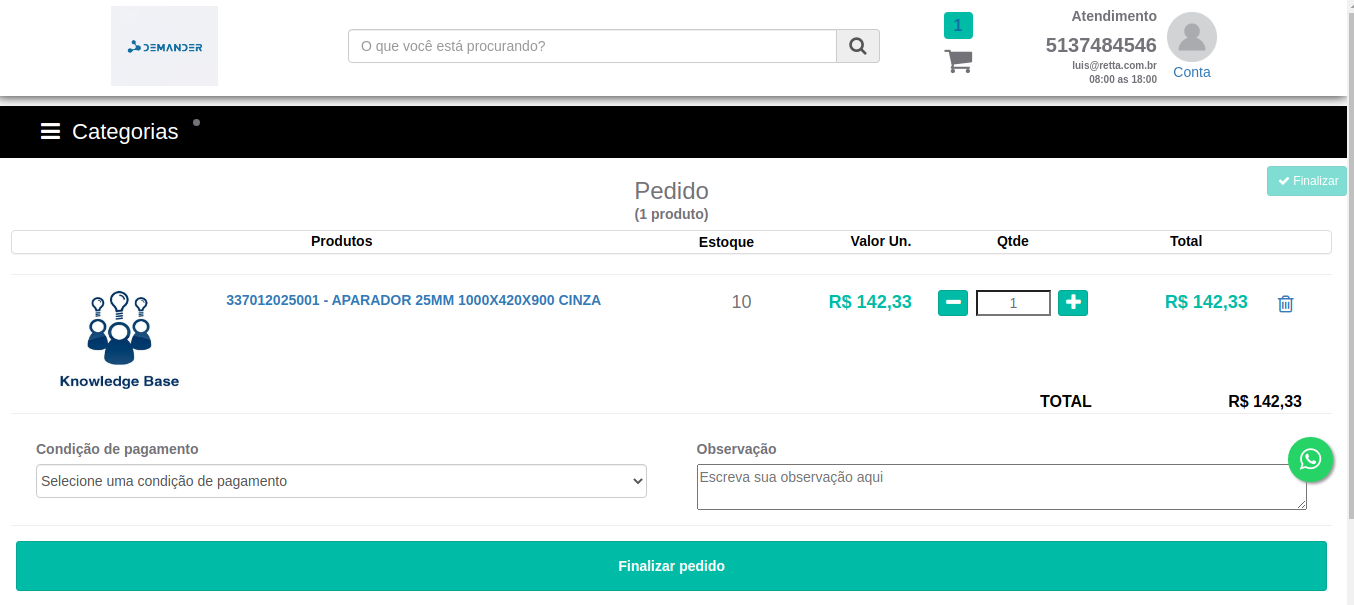
 When clicking on “cart” or “Complete order”, you will be directed to the screen below, where you can increase or decrease the quantity of the product or delete the product from the cart. To finalize the order, select a payment condition (if the customer has a payment condition defined and blocked, only that condition will appear) and click “Finalize order” at the bottom of the page.
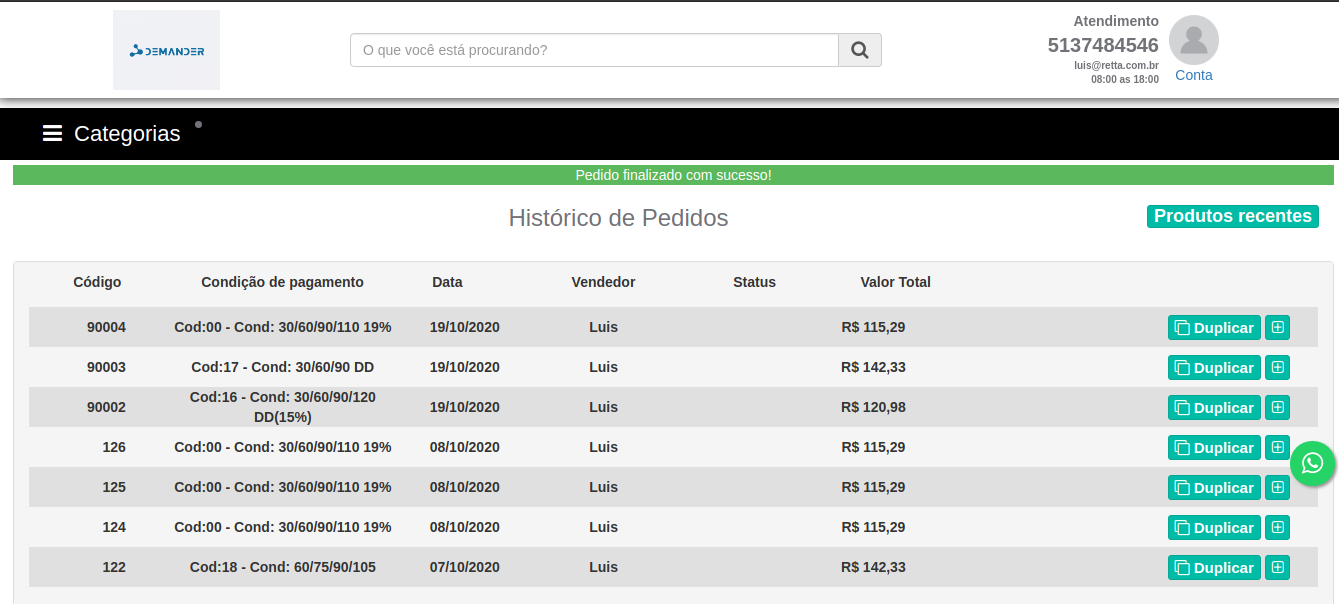
The order will be confirmed and the order history page will open. On this screen, you can view order details, view recently purchased products and duplicate a previously placed order.
Additional Store features:
Section titled “Additional Store features:”WhastApp icon
Section titled “WhastApp icon”By adding the WhatsApp icon and linking your number, the icon will be available on all store pages. When the customer clicks on the icon, a WhatsApp conversation will automatically open, directing to your number.
- Whatsapp icon in the B2B Online Store
- Lost Affection Event
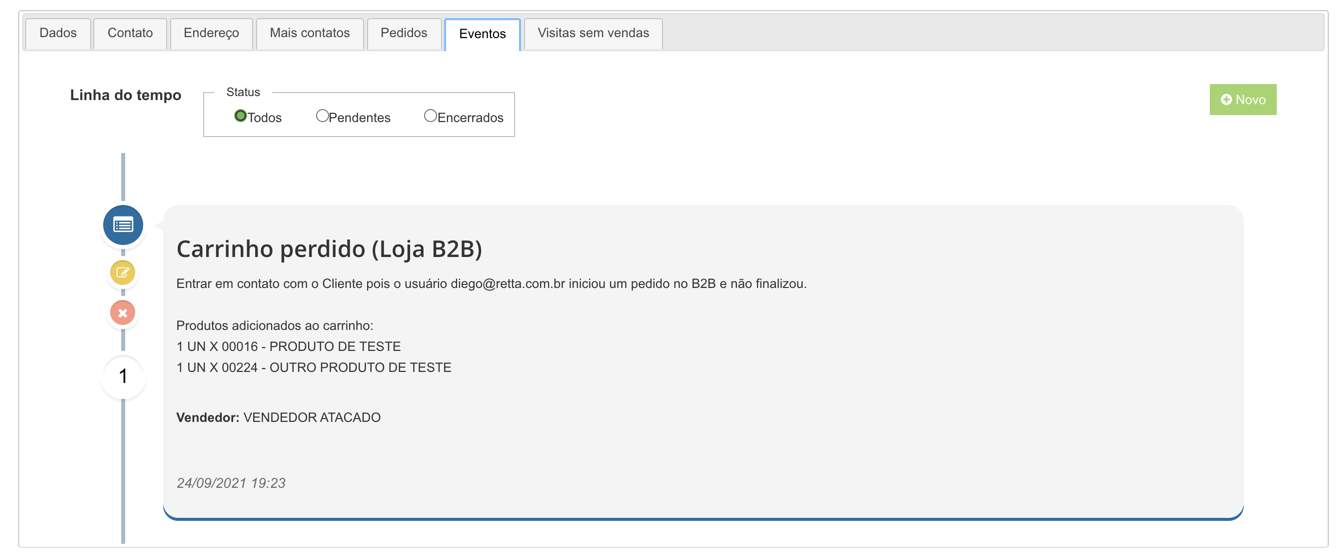
This functionality aims to identify which customers are adding products to the cart, but are not completing their orders, in addition to informing which products were added.
The information will appear on the [Telesales] screen (https://sistema.demander.com.br/dinamico/televendas) or on the [Customers] screen (https://sistema.demander.com.br/dinamico/clientes), within the “Event” tab.
IMPORTANT
- For the information to appear correctly, it is necessary to previously create a specific Event Type .
- To activate
- In Demander Web, register an Event Type with Operation Type 70.

- After registration, events will be created automatically each night, meaning that information will only be available in the report the next day
- Customer accessing without placing an order
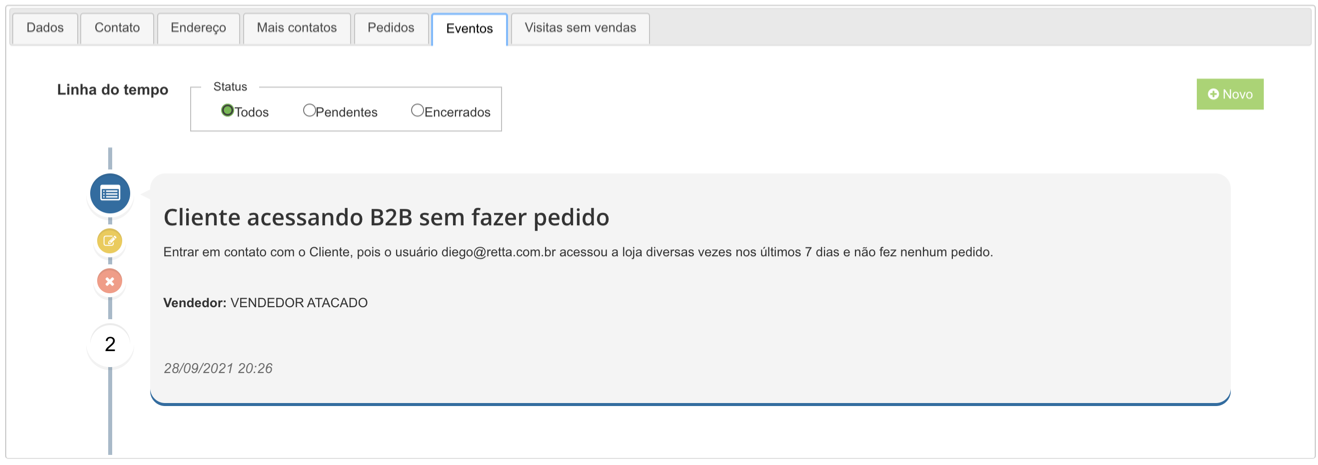
This functionality aims to identify which customers are accessing the B2B Store, but are not completing any orders.
The information will appear on the [Telesales] screen (https://sistema.demander.com.br/dinamico/televendas) or on the [Customers] screen (https://sistema.demander.com.br/dinamico/clientes), within the “Event” tab.
IMPORTANT
- For the information to appear correctly, it is necessary to previously create a specific Event Type .
- To activate
- In Demander Web, register an Event Type with Operation Type 80.

- After registration, events will be created automatically each night, meaning that information will only be available in the report the next day