

How to map commissions? (PlugSales)
This functionality allows you to display commission information to the seller logged in to the application. To map commission data in PlugSales, records must return the following data:
*Attention, fields with (*) are mandatory and must contain data in their fields.
- ID*
- Numeric field of type integer.
- Identifier of the commission table.
- Every commission must have an identifier.
- This field is mandatory.
- Commissions with identical identifiers (ID) are not possible.
- USER*
- Numeric field of type inteiro
- This field must contain the user/seller ID.
- The Value of this field must be the same as that entered in User mapping.
- CLIENT*
- Numeric field of type inteiro
- This field must contain the customer ID.
- The Value of this field must be the same as that entered in Customer mapping.
- REQUEST*
- texto field containing a value to identify the seller’s order, this field will be displayed in a column in the list of commission orders.
- ORDER_DATE*
- Field of texto
- This field must contain the order date in the format: YYYY-MM-DD.
- ORDER_VALUE*
- Numeric field of type real(float/decimal)
- This field must receive the value of the order that generated this commission.
- COMMISSION_VALUE*
- Numeric field of type real(float/decimal)
- This field must receive the commission value.
- SITUATION*
- texto field with the status of the commission.
- Example: Paid, Pending…
- ADD CUSTOM FIELD*
- Using custom fields you can enter more information about your COMMISSION.
- In this field it is necessary to determine the typing (Monetary or String).
- A field in your database must be related.
- The record in this field will be displayed next to the COMMISSION information. Learn more about how ‘Add custom field’ works. Note: For these fields to be reported correctly, we recommend creating a specific view and entering it in the PlugBot panel.
Read: Creating a view to map commissions
To start configuring commissions, define the interval at which PlugBot should synchronize your system’s records with your PlugSales.
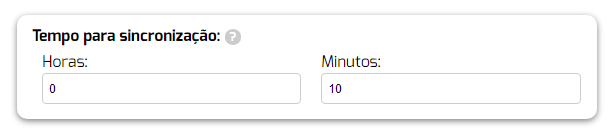
Note: We recommend using at least 10 minutes
After selecting the Source Tableor entering the SQL Source, click “Load data”.
With the data loaded, you can begin the field mapping process, following the instructions for each field.
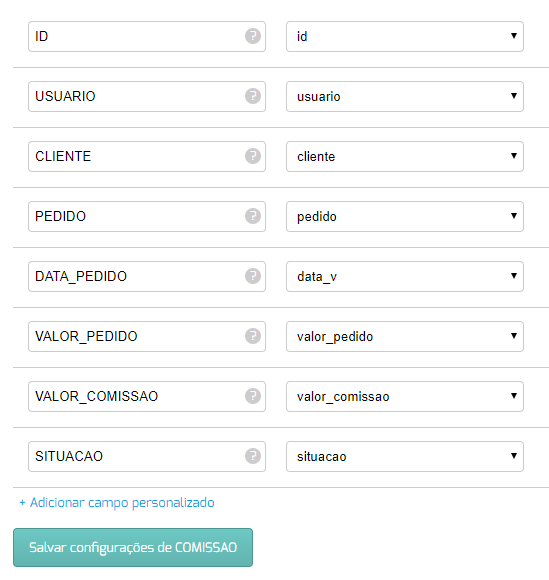
Find out more about how ‘Add custom field’ works.
With all fields mapped, click “Save COMMISSION Settings” at the bottom of the screen.