

1. How to map customers? (PlugSales)
This article aims to explain how to insert and map new customers in the application, ensuring that the integration with the database works correctly.
In this article you will see:
- How to add new customers through the app
- Parameters sent by the application
- Example of SQL query for insertion
- Custom fields (input)
Inserting new customers
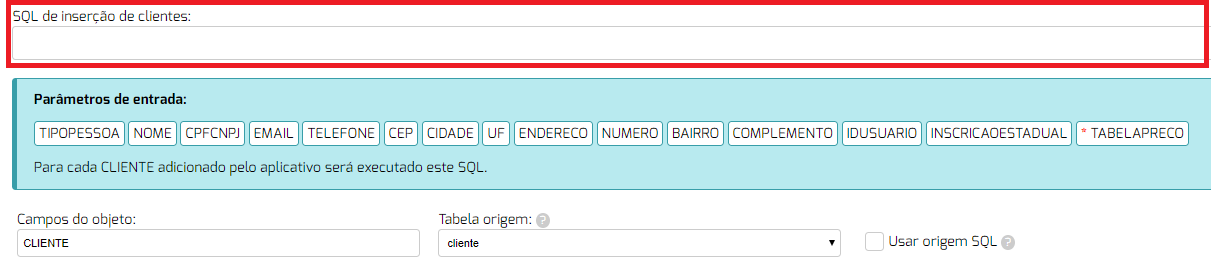
To insert new customers through the application, it is necessary to use the specific SQL configuration field for customer registration.
The configured SQL query will be executed whenever a new customer is registered in the PlugSales application through the PlugBot integrator.
In this field, you can use any SQL command responsible for inserting data into your database.
For the insertion of the new customer to occur correctly, SQL must receive the parameters sent by the application. The command must be described in the same way as it is executed directly in your database.
The parameters sent by the application must always be used in square brackets. Example: [NAME]
Parameters sent by the application
Attention: PlugBot considers that the customer table has an auto-increment identification field (ID / number / code). If your table does not have an automatic increment, the query must contain a manual increment or use a procedure responsible for generating the identifier and performing the insertion.
Parameter list
Section titled “Parameter list”-
TYPEPESSOA (text) Returns the type of customer: Individual or Legal Entity, as selected in the application.
-
NAME (text) Returns the company name or name of the registered customer.
-
CPFCNPJ (text) Returns the customer’s CPF or CNPJ.
-
EMAIL (text) Returns the customer’s email.
-
PHONE (text) Returns the customer’s phone number.
-
ZIP code (text) Returns the customer’s zip code.
-
CITY (text) Returns the client’s city.
-
UF (text) Returns the client’s UF.
-
ADDRESS (text) Returns the customer’s address.
-
NUMBER (text) Returns the customer’s address number.
-
NEIGHBORHOOD (text) Returns the client’s neighborhood.
-
COMPLEMENT (text) Returns the complement of the address.
-
IDUSUARIO (whole number) Returns the ID of the user who registered in the application.
-
STATE REGISTRATION (text) Returns the customer’s state registration, first name or surname.
-
TABLETABLE (whole number – optional) If you use a price table, it returns the ID of the table linked to the customer at the time of registration.
SQL example for customer insertion
Example in MySQL database
Section titled “Example in MySQL database”INSERT INTO CUSTOMER (person_type, name, CNPJ, email, telephone, zip code, city, UF, address, user, complement, number, neighborhood, insc_est) VALUES
Attention: Text (string) parameters must be enclosed in apostrophes. Example: ‘[NAME]’ Numeric parameters do not need apostrophes.
Note: If special characters are identified in text fields, such as ’ “ | , line breaks or emojis, these characters will be automatically removed to avoid integration conflicts.
Custom fields (input)
To use custom fields in customer registration, you can configure them directly in the integration.
When adding a custom field, you must:
- Define typing (Monetary or String)
- Define whether the information will be sent to the order PDF
- Relate the field to the database
- Ensure value is displayed alongside customer information
Mapping customers
To map customers in the system, each record must contain the mandatory fields below.
Please note: all mandatory fields must return valid records.
Required fields*
Section titled “Required fields*”-
ID* Integer numeric field. Identifies the customer in the order.It cannot contain duplicate values and must exist for all customers.
-
REASON* Text field with the company name or name of the customer.
-
FANTASY* Text field with the customer’s first name or surname.
-
CNPJ/CPF* Mandatory text field for all customers.
Additional fields
Section titled “Additional fields”-
ADDRESS: customer address TELEPHONE: customer telephone number EMAIL: customer email CITY: city UF: state
-
SITUATION: Field used to identify the customer’s situation and enable blocking.
-
USER: Numeric field with the user code linked to the customer. Defines which clients are available to each user.
Add custom field
Custom fields allow you to enter additional information into the customer record.
To configure:
- Define field typing
- Choose whether it will be displayed in the PDF
- Relate to a database field
- The value will be displayed next to the customer information
It is recommended to create a specific view to map customers and report it on the PlugBot dashboard.
Sync Setting
To start the configuration, define the interval for synchronizing records between the system and the application.
Recommendation: use a minimum interval of 10 minutes.
After selecting the source table or entering the SQL source:
- Click Load data
- Carry out field mapping
- Follow the instructions displayed in each field
Click Save CLIENT Settings
Customer blocking
It is possible to configure blocking situations to prevent orders from being placed for certain customers.
The blocking is defined based on the STATUS field.
Example: If the SITUATION field is INACTIVE and this situation is configured as blocking, the customer will not be able to place orders.
Blocking examples
Section titled “Blocking examples”- INACTIVE
- UNDER ANALYSIS
- INACTIVE, BLOCKED
Notes:
- In case of multiple situations, separate with a comma
- There is no differentiation between upper and lower case letters (e.g. Inactive and INACTIVE are equivalent)
After completing all configurations and mappings, click Save CLIENT Settings at the bottom of the screen.