

Custom fields in the customer (input) (PlugSales)
This article aims to explain how to add and configure custom fields (inputs) in the PlugSales customer record.
In this article you will see:
How to activate a custom field
To add a new custom field to the PlugSales customer record, access PlugBot and follow the steps below:
- Access the Customers tab
- Locate the Add custom field option
- Enable this option to create a new camp

After adding the field, you will need to:
- Set the field name
- Select the type of data it will receive
- Set a default value (if not populated)

The default value will be used automatically when the field is not entered in the registration.
Custom field parameter
Once created and configured, a new parameter will be available with the same name defined for the field.
This parameter will receive the value filled in when registering a new customer and can be used in the SQL insert, as well as the other system parameters.
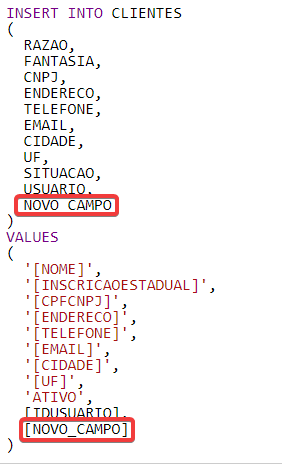
The value sent will depend on the type of field selected.
Available field types
Type: Options
Section titled “Type: Options”The Options type allows you to create a selection field within the application.
In this case, it will be necessary to configure the source of the data that will be displayed as options for the user. You can use:
- A source table
- Or a source via SQL
The configured query must return two columns:
- value: used by PlugBot when replacing the parameter in the insert
- text: displayed in the application as an option for the user
Important notes:
- The query result must return two columns: TEXT and VALUE
- If you use SQL Source, use aliases to name the columns
- In Firebird integrations, use double quotes: “text” and “value”
SQL example:
SELECT column1 AS “value”, column2 AS “text”
FROM table
See:
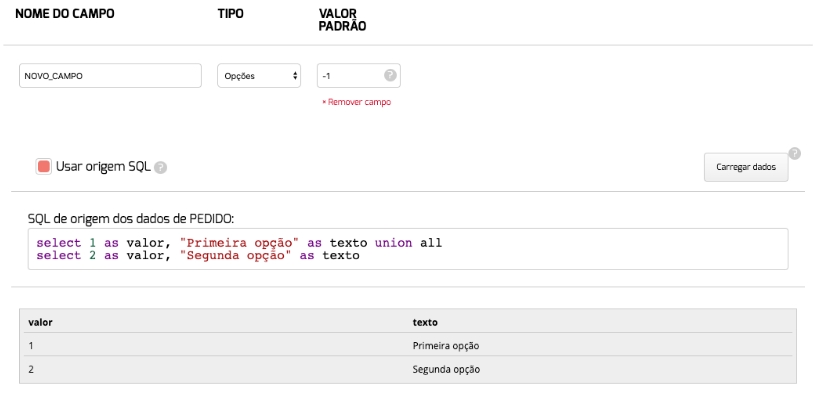
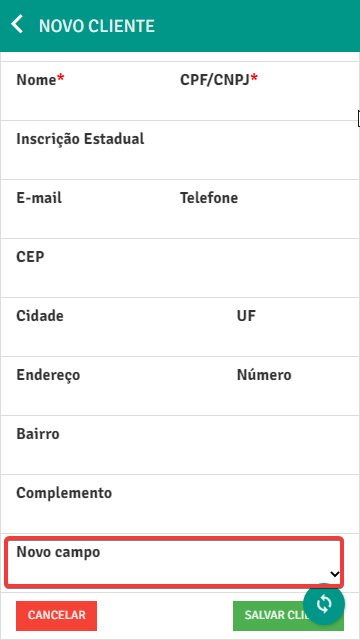
In the application, the user will view the text and the system will send the corresponding amount to the bank.
Type: String
Section titled “Type: String”The String type allows you to send any information in text, including:
- Lyrics
- Numbers
- Characters
The filled value will be sent to the corresponding parameter and can be inserted into the database.

It is also necessary to define a default value if the field is not filled in.
Type: Number
Section titled “Type: Number”The Number type will only accept numeric values.
The number entered will be sent to the corresponding parameter and can be used in the database insertion query.

Type: Date
Section titled “Type: Date”The Date type will be displayed in the application in a calendar format.
The user can only select valid dates. The chosen date will be sent to the corresponding parameter and can be inserted into the database.

Using the custom field in registration
Section titled “Using the custom field in registration”After configuring the custom field:
-
The new field will be displayed in the customer registration in the application
-
The completed value will be sent to PlugBot The corresponding parameter can be used in the insertion SQL
-
The value will be saved in the bank as configured
With this, it is possible to expand customer information and personalize registration according to the company’s needs.